D I S C L A I M E R

Although I write about products and techniques, I don't receive compensation of any kind from anybody. The products that I write about work for me in my setting as an artist.

Thursday, December 31, 2009

Home-made painting supports

I had to use Google for the proper term for painting panel, painting canvas and etc. I found this definition at http://www.goldenpaints.com/technicaldata/prepsupp.php "The term "support" refers to any material onto which paint is applied. Canvas, wood, and paper are common painting supports, but the types of supports used for artwork are very extensive". . . . .

So, OK, I make my own supports and have for as long as I've been painting. Oh, I do buy the prepared supports but there is only one (1) source within thrty miles of where I live.  The prepared supports (in my opinion are overpriced for the poor quality) PLUS, I enjoy the diversion of doing it myself.  Most of the time I just cut Masonite into the size of support(s) that I want. Then I tried gluing fabric to the Masonite. Just gluing the fabric to the raw support doesn't work well because the fabric shrinks and leaves funky edges. I have glued fabric to plywood, but GOOD plywood is much more expensive than Masonite. I'm a really CHEAP so-and-so. Ask my daughters! :-)

This is how I do it now. I will probably make changes to this process to improve the "product" - or make it easier. I wear disposable vinyl gloves whenever I use Rabbit Skin Glue, apply Gesso to my supports and/or I paint my home-made picture frames.
  • With my power table saw I cut square strips from the pine lumber. (The same pine lumber that I use to make my picture frames)
  • I cut my masonite about an eighth of an inch larger than necessary - a 16x20 finished support will be cut to about 16 1/8 x 20 1/8.  If I'm feeling good, I cut it to the correct size.
  • I cut wood pieces to make a frame upon which I nail and glue the masonite.  After all is dry, I sand all of the edges of the new panel - top and edges.
  • I use my table saw again to trim the support to the accurate measurements - as accurate as I get.  Sometimes my accuracy is only in my mind.
  • I cut cotton duck canvas (from the fabric store) about 2 - 3 inches larger than the Masonite panel support.  
  • I stretch (with my fingers) and staple the canvas to the  back edges of the wood frame. 
  • I use RABBIT SKIN GLUE (RSG) to glue the canvas to the panel top and sides.. The RSG shrinks the cotton duck canvas very tight. (I think any warm wet will shrink the cotton.) You can google "make your own supports" and see that many types of glue are used.  For whatever reasons (unknown to me) I like to use RSG.
  • When the RSG is dry I sand all of the surfaces and give the support one more coat of RSG.
  • When this is dry I give it another light sanding just to knock off any bumps.
  • I paint the support with three (3) coats of gesso, lightly sanding between coats.  I like to tint my gesso - white supports inhibit me for some reason.


A finished support showing the back. The canvas is stapled on the back and the staples do not show if you paint the edges. The back edges have been trimmed flush to the wood frame with a razor knife.


One of the drawbacks that I haven't resolved. The canvas "curls" away from the wood frame. Maybe more staples?  Does it matter?   I don't know.


The staples are barely visible under the tinted (gray) gesso.


The finished support with three (3) coats of tinted acrylic gesso, sanded between coats.
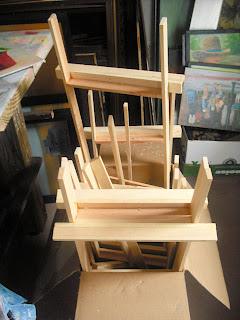
Table Easels

I use some of the scrap from my home-made picture frames to make table easels.  They aren't much to look at, but they work!  They're about 30 inches tall and about 9 inches wide.  I glue and nail them together but I (usually) don't paint them. I modeled my plain-jane table easels after a "store bought" fancy table easel. We bought the "fancy" table easel at the thrift store for $3.00, woo hoo!


An empty table easel with some in the background holding "wet" paintings


The back side of the table ease. There is a piece of wire from the front painting support to the back leg. This keeps the back leg from opening too far.


The "hinge" for the back leg. This is the weakest part of these little easels. I made the hinge from scrap framing molding and the little brackets break easily when the back leg is not handled gently.


I made a couple dozen for our Art Guild show so that people could put smaller paintings on table tops.

Picture Frames

I make most of my own picture frames from pine boards bought at the "lumber yard".  I buy pine 1 inch by 8 inch by 8 foot boards (with the least number of large knots) and rip (with my table saw) them into strips. (I buy 8 foot boards because they fit into the back of our Subaru Outback car.) Then I make two cuts in the strips leaving the picture frame "molding".  I make two size "moldings" - i call them "deep" and "shallow".  The deep frames hold stretched canvas or my canvas/masonite panels. The shallow frames are for the smaller (16x20 and smaller) Masointe paintings.

I make each frame to fit a particular painting - sometimes my paintings aren't quite the "correct" measurement.I glue and with the mitered corners held in frame-corner clamps, nail the mitered corners then use wood putty to fill any nail-holes or nicks in the wood. Then I give the frame one coat of latex satin paint - usually black.  I give the frame another sanding in (about) 24 hours, when the first coat of paint is dry and another coat of paint.  Another sanding then another coat of paint and the frame is ready for the painting.  And I DO wear disposable latex gloves when I paint my frames!


I usually make a dozen or more frames when I make frames - sort of an assembly line process. cut the frames wood strips, measure and miter the frame sides, assemble the four sides of the frames, then sand and paint.

I have a Bostitch air powered "brad nailer" that was a present from Melissa. The same compressor powered the framing nailer we used to assemble the studio.  Very handy tool!


Shallow molding on top, with the deep molding on the bottom.


The front side of a deep frame assembled and painted satin black. The line in the corner is a reflection and isn't that obvious without a flash from the camera.


The back side of the deep frame pictured above. Most of the time I don't paint the "inside" or back of the frame.

Wednesday, December 30, 2009

The BEST paint solvent and brush soap EVER!

I heard about the solvent product from an artist who made a presentation / demonstration at an art club meeting. The product is a citrus-scented industrial "multi-purpose solvent" called Citrus King.  It cleans my oil painting brushes so thoroughly that they don't get much cleaner when I wash them with soap and water. A nice thing about Citrus King is that it smells GOOD! It smell like oranges!

This stuff cleans my brushes when somebody doesn't clean them (doesn't clean them well) the last time they used the brush(es).  A good cleaning with this stuff then a wash with the Fels Naptha Soap and the brush is good to go!  :-)

They also sell other sizes - up to 5 gallon buckets which is probably a bit much for most of us.Try the 1 pint "trial" size for $10.00 plus shipping.


The one gallon size of Citrus King. I've had mine for several months and have used about 1/3 of the gallon. And I use it VERY OFTEN when I'm making a painting.  I'll use one or two brushes and just clean the brush, wipe it dry and get into another color.


THE SOAP!  The BEST brush cleaning soap - EVER - is Fels Naptha Soap. I buy it in a 5 ounce bar from Amazon dot com. It lasts a very L-O-N-G time for me.  I learned about this while taking an oil painting class in Seattle in the mid 1980's.  The instructor swore by it and she was (in my opinion) right.


A new 5 ounce bar of Fels Naptha Soap


My year-old-plus bar of Fels Naptha soap. I didn't need to buy two bars!

My Palette

I used wood or wood-like palettes until I retired and started painting just about every day after my studio was completed.  I'm a "dirty" painter - I don't always clean my palette at the end of a days painting. After a while I have a palette with gobs of gunk firmly attached.  Scraping the hardened gobs of gunk off of a wood palette was just destroying the palette with gouges, scrapes - you know what I'm talking about if you use a wooden palette & you're like me.

I found the answer at Walmart (where else?) in the kitchen doo-hickey department. It's a 16x20 inch glass cutting board.  I keep it on my taboret in an upside-down 16x20 inch picture frame.  Underneath the glass I keep a 16x20 inch piece of masonite (as a filler to fit the frame) covered with very light gray (almost white) water color paper.  After I scrape the gobs of gunk off of my palette I clean the glass with Citrus King "degreaser".  Sooner or later the paper under the palette becomes stained and I replace it with a clean sheet of paper. IT WORKS FOR ME!  :-)


A corner of my gunky palette an my gunky taboret top showing my de-gunking tool - a razor blade.  I've used this glass palette for almost a year and the razor has made a couple of scratches but it's still in really good shape - for a paint palette.

 
This is my upside-down picture frame with watercolor paper & a sheet of paper with a grid for making "portait colors"


My brush holder - a piece of wood picture frame molding with some notches cut into the short side.  This keeps my brushes off of my (ahem) clean taboret top, and keeps the brush from rollong off of the taboret onto the floor.


Books that I keep near my easel - Number two

These are other books on the shelf near my easel.  I don't use them as often as Color Mixing For Portraits, but they are no less valuable to me.  I especially like the Helen Van Wyk books. Her PBS programs kept me interested in painting when I was "too busy" raising a family and caring for my late wife.

In no particular order of importance these are four books that I like to look at, even if I'm not painting anything at the time.  I have other books, but they're in a book case in the other corner of my studio.

I don't work for Amazo dot com, but if I'm looking for a book . . .   'Nuff said.


Books that I keep near my easel - Color Mixing Recipes For Protraits

There are five books that I keep on a shelf close by my easel. The Number One (numero uno!, Primo!) is "Color Mixing Recipes For Protraits" written by William F. Powell. The "official" title is Color Mixing Recipes for Portraits: More than 500 Color Combinations for skin, eyes, lips & hair which is more than I can type in one day.


If you struggle with painting people as I do, BUY THIS BOOK!  The links will take you to Amazon dot com but I'm sure other book sellers have this book.

I use "Color Mixing Recipes For Protraits" almost every time I make a painting that has a person or persons in it. It's been invaluable source for mixing colors for skin, eyes, ears, hair and etc. etc. etc. I've used it enough that I'm beginning to remember MOST (some?) of the "recipes".


The best part is that I can repeat a color later if need be.  I  keep a grid under my glass palette on my taboret.  I use this book whenever I paint a figure in a painting. Expecially if the person is not caucasian!


Monday, December 28, 2009

My studio- heating and cooling.

I have a "window" air conditioner built into the eastern wall of my studio. It keeps me comfortable even when the outside temperature reaches the high 90's with high humidity.  The heater is a "small" space heater that keeps me comfy when the outside temperature is in the teens!

I leave my heater on 24 hrs when the temperature is going to be around or below freezing.  I keep the A/C on "low" when the weather is warm - hopefully to control the humidity.

I'm including a photo of the back of our house taken from my studio porch the day before yesterday, December 27th 2009.


My studo - my work space.

I make my paintings in the Northeast corner of my studio with my back to the desk with the storage bins and the North.  I face the Southeast corner of the studio when I'm at my easel. 

I built my "taboret" from scrap lumber (from building the studio) and three second-hand keyboard trays we found at a second hand store.


My studio - lighting

Although I don't usually work after the sun goes down, I do have good lights in my studio. The track lights on the ceiling are VERY brigh and VERY HOT to the touch!  The ceiling is 13 feet from the floor.  There are two lights built into the loft that shine on my computer desk.  


I've found that I need a light focused on my easel but the track lights won't point where I need 'em.  I'll have to install a light source to shed some light on my paintings while I'm painting. :-)


My studio - miscellaneous things number 1

I use these hooks (called "piniup hooks) in my pegboard to hang my paintings. I found them at Grand & Benedicts online store. They don't come out of the pegboard when I turn the panels of my displayed art. Everything I tried previously either fell out or wouldn't hold my paintings securely.

I build model airplanes from Guillows kits - balsa sticks and tissue paper. The planes don't fly I just like to build them. The B-17 has a 24 inch wingspan.  I have more to build, but have been busy painting.

The view out the window is to the West.


My studio - more storage

In my studio above the East wall there is a little "loft" to hold boxes of "stuff".  I also built a BIG 5 ft x 7 ft HEAVY table on wheels that I can move around to put it where I need it and I don't have to be gentle with it.  All four of the 3 inch casters swivel.

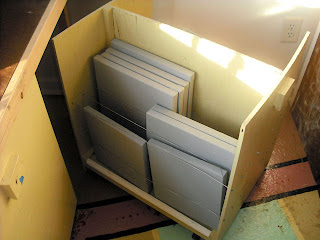
I also built a small cabinet with space to put my wet paintings to dry.  Although I have this storage cabinet, I still stack my paintings on the floor & the cabinet is virtually empty! Who knew?  :-)


My studio - storage bins on wheels.

I made these storage bins to hold my "stuff" - power tools, blank canvases (supports/grounds). The bins have four casters with the front two casters being swivel casters. There are six of these bins. All have a vertical 1/8 inch pegboard center wall and are open to the sides and top. Some bins have a shelf midway up on one side.


My studio - no particular dates

Earlier this year my hard-drive "crashed" and I learned that my regularly scheduled file backup system was irregular (to be kind) and some photos weren't backed up (saved).  Then this month photos from my first blog (Avocaken) vanished into internet la-la land.  So, to have photos of my studio, I went out the other day and took photos of the stuff that I had blogged about in my other blog.  I"m including pictures of the stuff that I THINK folks might find interesting and/or useful.

I'm using the "new" Blogger editor and I'm not accustomed to how it works. So the photos will happen more or less where the editor wants them to be.

The stained glass window is one of two that Melissa bought for me. They're on the south wall.

The pegboard panels of paintings are how I display some of my "small" paintings. The panels turn like pages in a book with paintings hung on both sides of the pegboard. The panels are hinged on wooden pins held in place by holes in the overhead shelf and in the floor mounts. Presently I have four (4)  2ft x 6ft panels with room for several  more panels when I need them. (NOW?)  :-)

The "rug" is one of two faux rugs we painted on the bare floor. The white thing on the faux rug is my little space heater.


July 2009 - Studio still under construction


Photos of the interior of my studio after the drywall is installed (by professional drywallers) but before the drywall is "mud" is applied.